
In this article:
- What is an Itemized Invoice? A Clear Definition for Freelancers
- Essential Elements of a Freelancer's Itemized Invoice
- When to Use Itemized Invoices vs. Simple Invoices
- How to Create an Effective Itemized Invoice (Step-by-Step)
- Common Mistakes to Avoid with Itemized Invoices
- Legal and Tax Considerations for Freelance Invoices
- Tools and Templates for Creating Professional Itemized Invoices
- Getting Paid Faster with Strategic Invoicing
- Conclusion: Mastering the Itemized Invoice Process
As a freelancer, getting paid accurately and on time is critical to keeping your business afloat. But when a client asks for an “itemized invoice,” do you know exactly what they’re looking for? If you’ve ever been confused about what makes an invoice “itemized” or how to create one that satisfies both you and your clients, you’re not alone.
Having worked with thousands of freelancers over the past decade, I’ve seen that invoice confusion is one of the biggest hurdles to getting paid properly. The good news? Creating professional itemized invoices isn’t complicated once you understand the basics.
What is an Itemized Invoice? A Clear Definition for Freelancers
An itemized invoice is a detailed billing document that breaks down every service, product, or billable hour into separate line items, each with its own description, quantity, rate, and amount. Unlike a basic invoice that might just show a total amount due, an itemized invoice provides complete transparency about what the client is paying for.
Think of it like a receipt from a grocery store. Instead of seeing just the total ($87.53), you see each item you purchased (apples: $2.99, milk: $3.49, etc.). This level of detail serves both you and your client by creating a clear record of the work completed.
Why Clients Ask for Itemized Invoices
When a client requests an itemized invoice, they’re usually looking for:
Budget Tracking – They need to track expenses for different projects or departments
Expense Justification – They may need to justify expenses to upper management or for tax purposes
Transparency – They want to understand exactly what they’re paying for
You Deserve Better Clients...
We can help you find them. Just send us the details and we'll hunt down leads that match your business needs. All on autopilot.
Accounting Requirements – Their accounting department may require itemized documentation
For freelancers, providing itemized invoices isn’t just about meeting client demands—it’s also about protecting yourself and ensuring fair compensation. When you clearly document every service provided, you reduce the chance of payment disputes and establish a professional reputation.
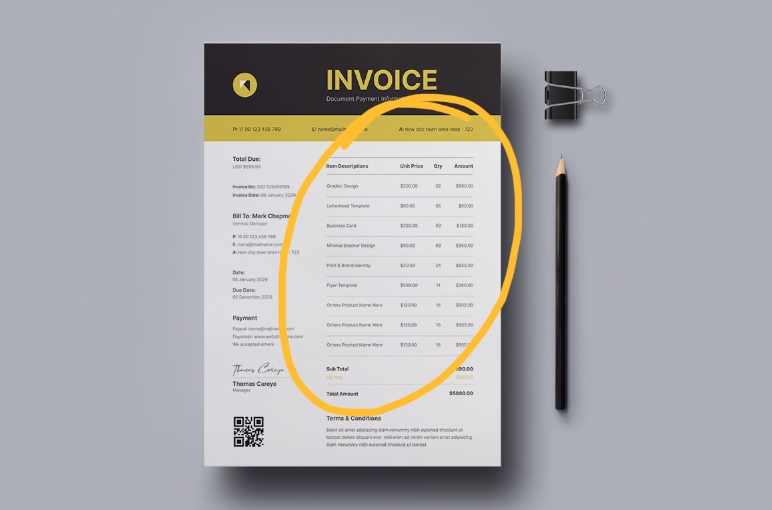
Essential Elements of a Freelancer’s Itemized Invoice
Creating an effective itemized invoice requires including certain key elements. Here’s what you need to include for a comprehensive invoice that satisfies both professional standards and client expectations:
Basic Invoice Information
Your Business Details – Include your name, business name (if you have one), address, phone number, and email. If you have a website or professional social media presence, consider adding those as well.
Client Information – Full name of the client, their company (if applicable), and complete contact information. Make sure you’re sending the invoice to the right person—sometimes the person you work with isn’t the person who processes payments.
Invoice Number – Assign a unique number to each invoice for tracking purposes. Many freelancers use a system like “INV-001” or “2025-001” to keep organized.
Issue Date and Due Date – Clearly state when the invoice was created and when payment is expected. This helps both with your cash flow planning and the client’s accounts payable processing.
Itemized Services Section
This is the heart of an itemized invoice and where most freelancers need to pay special attention:
Detailed Service Descriptions – For each task or service provided, include a clear, specific description. Instead of “Website Work,” write “Homepage Redesign – 5 revisions included” or “Blog Content – 1500-word article on digital marketing trends.”
Quantity and Units – Indicate how many hours, words, pages, or units of service you provided. For time-based work, I recommend breaking this down by task rather than just listing a total number of hours.
Rate – Your price per unit (hour, word, project phase, etc.)
Line Item Total – The calculation of quantity × rate for each line item
Financial Details
Subtotal – The sum of all line items before any adjustments
Discounts – Any reductions in price (if applicable)
Taxes – Sales tax or VAT if required in your location
Fees – Any additional charges such as rush fees, materials costs, or third-party expenses
Total Amount Due – The final amount the client needs to pay
Payment Information
Payment Terms – Clearly state your payment timeline (e.g., “Due upon receipt,” “Net 15,” “Net 30”)
Accepted Payment Methods – List all ways clients can pay you (bank transfer, PayPal, credit card, etc.)
Late Payment Terms – Include any late fees or interest charges for overdue payments
Banking Details – Provide the information needed for direct deposits or wire transfers
When to Use Itemized Invoices vs. Simple Invoices
Not every freelance job requires an itemized invoice. Here’s when to use each type:
Use an Itemized Invoice When:
The client specifically requests it – This is the most obvious reason, and you should always accommodate this request.
You’re billing for multiple services – If you provided various types of work (design, development, and content, for example), an itemized invoice clearly distinguishes between them.
You charge different rates for different tasks – When your hourly or project rates vary depending on the type of work, itemization clarifies why the total looks the way it does.
The project spans a significant time period – For longer projects, itemizing helps both you and the client track progress and understand how time was allocated.
You need to document expenses – If you’re billing for reimbursable expenses, itemization provides the necessary documentation.
A Simple Invoice Might Suffice When:
You’ve agreed to a flat project fee – If you and the client agreed on a single price for the entire project, a simple invoice with just the project name and total might be adequate.
You have an ongoing retainer arrangement – For regular monthly services with a set fee, a simple invoice may be all that’s needed (though many clients still appreciate itemization).
You’re sending a deposit invoice – When billing for a deposit or down payment before work begins, a simple invoice referencing the proposal is usually sufficient.
When in doubt, I always recommend going with an itemized invoice. It provides greater transparency and reduces the chance of confusion or disputes. Plus, it’s much easier to start with more detail and simplify later than to be asked to provide additional details after the fact.
How to Create an Effective Itemized Invoice (Step-by-Step)
Now that you understand what goes into an itemized invoice, let’s walk through the process of creating one:
1. Choose Your Invoicing Method
You have several options for creating invoices:
Invoicing Software – Apps like FreshBooks, Bonsai, or Moxie offer templates and automation features specifically designed for freelancers. These tools often include time tracking, payment processing, and automatic reminders.
Accounting Software – Programs like QuickBooks or Wave provide invoicing features along with more comprehensive financial management tools.
Templates – Microsoft Word, Google Docs, and Excel all offer invoice templates you can customize.
Custom Design – If you have design skills, creating your own branded invoice template can add a professional touch.
For most freelancers, I recommend using dedicated invoicing software. The time you save and the professional impression you make are well worth the investment. Plus, these tools often provide features like automatic payment reminders, which can significantly improve your payment collection rate.
2. Gather All Necessary Information
Before creating your invoice:
Review your time tracking – Make sure you’ve accurately recorded all billable hours or completed tasks.
Collect expense receipts – If you’re billing for expenses, have documentation ready.
Check your contract – Verify the agreed-upon rates and payment terms.
Confirm client details – Ensure you have the correct billing address and contact information.
3. Create Clear Line Items
This is the most critical part of an itemized invoice. For each service or product:
Write specific descriptions – Be clear and detailed about what you did. For example, instead of “Website Work,” write “Homepage redesign including responsive layout, navigation restructuring, and integration of new brand elements.”
Break down complex projects – If you completed a large project, break it into logical components (research, design, development, revisions, etc.).
Be precise with quantities – Whether you’re billing by the hour, word, or project phase, be exact with your numbers.
Include dates when relevant – For time-based billing, noting the dates work was performed adds helpful context.
4. Calculate Totals Accurately
Double-check all your math:
Verify line item calculations – Make sure each quantity × rate = line total
Confirm the subtotal – Add up all line items
Apply any taxes or fees correctly – Make sure percentages are calculated accurately
Check your final total – The bottom line should reflect all additions and subtractions
5. Add Professional Touches
To make your invoice stand out:
Include your logo – If you have one, adding your logo reinforces your brand
Use consistent formatting – Maintain a clean, organized layout
Consider a thank you note – A brief message of appreciation can strengthen client relationships
Add your terms in a clear, visible place – Don’t hide important payment information in fine print
6. Send and Track Your Invoice
Once your invoice is ready:
Send it promptly – Don’t delay invoicing; the sooner you send it, the sooner you’ll get paid
Use a professional subject line – Something like “Invoice #1001 for Website Design Project” works well
Keep records – Save a copy of each invoice you send
Follow up – If payment is late, send friendly reminders
If you’re struggling to find time to create and send invoices consistently, you might want to check out a service like SolidGigs. Not only can they help you find quality freelance leads, but having a steady stream of work can make it easier to establish regular billing cycles.
Common Mistakes to Avoid with Itemized Invoices
Even experienced freelancers sometimes make these errors on their itemized invoices. Avoid these pitfalls to ensure smooth payment processing:
Vague Service Descriptions
One of the biggest mistakes I see freelancers make is using overly general descriptions like “Design Work” or “Consulting.” This defeats the purpose of an itemized invoice and can lead to questions or payment delays.
Solution: Be specific about what you did. For example, “Logo design – 3 concepts and 2 rounds of revisions” or “Strategic consulting on marketing campaign – 2-hour virtual meeting with follow-up documentation.”
Inconsistent Pricing
If your rates seem arbitrary or don’t match what was originally agreed upon, clients may question your invoice.
Solution: Clearly establish your rates before starting work and stick to them. If rates vary for different services, make sure the client understands why.
Missing or Incorrect Contact Information
Without complete contact information, your invoice may not reach the right person or department.
Solution: Verify who handles payments and include their name, email, and any required departmental information on your invoice.
Unclear Payment Terms
If clients don’t know when or how to pay you, they’re likely to delay.
Solution: Clearly state your payment deadline, accepted payment methods, and any late payment penalties. For example: “Payment due within 15 days of receipt. A 2% late fee will be applied to payments received after the due date.”
Sending Invoices to the Wrong Person
Your primary contact isn’t always the person who processes payments.
Solution: Ask your client who handles invoice processing and direct your invoices to them (while keeping your main contact in the loop).
No Invoice Number or Incorrect Numbering
Without proper invoice numbering, tracking payments becomes difficult for both you and your client.
Solution: Create a consistent numbering system and maintain it for all clients.
Neglecting to Follow Up
Sending an invoice isn’t always enough to ensure payment.
Solution: Implement a system for tracking unpaid invoices and sending reminders. Many invoicing platforms offer automated reminders, but even a simple calendar reminder for yourself can help.
Legal and Tax Considerations for Freelance Invoices
Properly itemized invoices aren’t just good for getting paid—they’re also important for legal and tax purposes:
Legal Protections
Detailed invoices serve as legal documentation of the services you provided and the agreed-upon compensation. In case of disputes, they can be crucial evidence.
Key practice: Always include terms and conditions on your invoices, such as payment deadlines, late payment penalties, and your ownership or license terms for the work provided.
Tax Documentation
Itemized invoices help you track income and expenses for tax reporting.
Key practice: Keep copies of all invoices for at least seven years (or whatever period is recommended in your country). Digital backup is essential.
Sales Tax/VAT Requirements
Depending on your location and services, you may need to charge sales tax or VAT.
Key practice: Research your local tax requirements and clearly itemize any taxes on your invoices. Some jurisdictions require specific information to be included on tax-compliant invoices.
International Considerations
If you work with international clients, be aware that different countries have different invoicing requirements.
Key practice: Research the invoicing requirements for the countries where your clients are based. Include any required information, such as your tax ID or their VAT number.
Tools and Templates for Creating Professional Itemized Invoices
Having the right tools can make creating itemized invoices quick and painless. Here are some top options for freelancers:
Specialized Freelancer Invoicing Software
Moxie – Features easy invoicing with Stripe integration, allowing you to create modern and simple invoices in minutes. You can add logged time from their built-in time-tracking tool and even itemize by each time entry.
Bonsai – Uses data from tens of thousands of users to help freelancers get paid 13x faster. Their beautiful invoice templates can be customized to match your brand.
FreshBooks – Highly recommended by our community of freelancers. You can create an invoice in less than 30 seconds and set up automatic reminder emails for clients who are slow to pay.
Bloom.io – Offers a free invoice generator with modern, customizable templates. You can collect retainers and even offer clients instant 0% interest financing on payments.
Lili – A banking app designed specifically for freelancers that includes invoicing capabilities. You can create and manage invoices directly from the app.
General Accounting Software with Invoicing Features
QuickBooks – A comprehensive accounting solution with robust invoicing features.
Wave – Free accounting software that includes customizable invoice templates.
Free Templates
If you’re not ready to invest in software, you can find free templates for:
Google Docs/Sheets – Basic but customizable templates that integrate with your Google account.
Microsoft Office – Word and Excel offer several invoice templates you can adapt.
Canva – Free and premium invoice templates with more design flexibility.
While free templates can get you started, I strongly recommend investing in proper invoicing software as your freelance business grows. The time saved and the professional impression you’ll make are well worth it. Plus, many invoicing platforms can help you track when clients view your invoices, send automatic reminders, and even process payments directly.
Getting Paid Faster with Strategic Invoicing
Creating clear itemized invoices is just the first step. To improve your cash flow, try these proven strategies:
Collect Deposits Upfront
One of the most effective strategies for getting paid as a freelancer is collecting payment before you begin work. This can be a partial or full payment, depending on the project scope and your relationship with the client.
As long-time designer and agency owner Marksteen Adamson advised: “Scope out your project. Show the clients all the stages, including costs, and mention to them at the start that you will be charging 60% upfront and the rest on completion of the initial concept stage.”
Designer Thad Cox agrees: “I find that a watertight contract and a 50% deposit helps. I use a client questionnaire as a filter to flush them out and won’t agree to anything unless a deposit is secured and a contract is signed. All good clients have no problem doing this, only the dodgy ones.”
Send Invoices Promptly
Don’t wait until the end of the month to invoice for work completed weeks ago. Send invoices as soon as you complete the work while the value you provided is still fresh in the client’s mind.
Offer Multiple Payment Options
The easier you make it for clients to pay, the faster you’ll receive your money. Consider offering options like:
Credit card payments – Despite the processing fees, the convenience often leads to faster payment
Digital payment platforms – PayPal, Stripe, or Wise for international clients
Direct bank transfers – ACH or wire transfers
Implement Late Payment Penalties and Early Payment Incentives
Encourage timely payment by including:
Late fees – A percentage of the total invoice amount (typically 1-2%) for payments received after the due date
Early payment discounts – A small percentage off (perhaps 2-3%) for payments received within a week of invoicing
Automate Follow-Ups
Don’t be shy about sending reminders. Use invoicing software that automates this process to remove the emotional aspect of asking for payment.
Set up a sequence like:
– A friendly reminder three days before the due date
– A notice on the due date
– A polite follow-up three days after the due date
– A firmer reminder with late fee information one week after the due date
Build Relationships with Accounting Departments
For corporate clients, getting to know the people who actually process payments can be invaluable. A friendly relationship with the accounting department might help your invoice move to the top of the pile.
Conclusion: Mastering the Itemized Invoice Process
Creating detailed, professional itemized invoices is an essential skill for any freelancer who wants to get paid fairly and on time. They provide clarity and transparency for your clients while protecting your business interests.
Remember these key points:
Be specific and detailed in your service descriptions
Use professional tools or templates to create consistent, polished invoices
Establish clear payment terms and enforce them
Follow up consistently on unpaid invoices
By implementing the strategies outlined in this guide, you’ll not only create better invoices but also improve your overall financial management as a freelancer. This means more timely payments, better cash flow, and ultimately, a more sustainable freelance business.
If you’re looking for more consistent freelance work to keep those invoices flowing, consider checking out SolidGigs. We’ll send you the best freelance jobs in your category every week, saving you time on job hunting so you can focus on delivering great work and getting paid what you’re worth.
Now go create those invoices and get paid!
One more thing...
You didn't start freelancing to spend hours every week searching through job boards. You started freelancing to do more work you enjoy! Here at SolidGigs, we want to help you spend less time hunting and more time doing work you love.
Our team of "Gig Hunters"—together with the power of A.I.—sends you high-quality leads every weekday on autopilot. You can learn more or sign up here. Happy Freelancing!
